Friday, October 14, 2016
Full form of most used Acronyms
GPS: Global Positioning System (ग्लोबल पोजिशनिंग सिस्टम)
SIM : Subscriber Identity Module (सब्सक्राइबर आइडेंटिटी मॉड्यूल)
MMS: Multimedia Messaging Service (मल्टीमीडिया मैसेजिंग सर्विस)
GSM: Global System for Mobile Communication (ग्लोबल सिस्टम फॉर मोबाइल कम्यूनिकेशन)
CDMA: Code Division Multiple Access. (कोड डिविज़न मल्टिपल एक्सेस)
JPEG: Joint Photographic Expert Group (ज्वाइंट फ़ोटोग्राफिक एक्सपर्ट ग्रुप)
LOL: Laughing Out Loud (लाफिंग आउट लाउड)
OK: Oll Korrect ( ऑल कोर्रेक्ट)
PNR: Passenger Name Record (पेसिंजर नेम रिकॉर्ड)
LCD: Liquid Crystal Display (लिक्विड क्रिस्टल डिस्प्ले)
IFSC: Indian Financial System Code (इंडियन फाइनेंसियल सिस्टम कोड)
TRP: Television Rating Point (टेलिविजन रेटिंग प्वाइंट)
LED: Light Emitting Diode (लाइट एमिटिंग डायोड)
UFO- Unidentifiable Flying Object ( अन आईडेंटिफाइेबल फ्लाइंग ऑब्जेक्ट)
How to disable taskbar preview thumbnails in Windows 10
In Windows 10, when you hover over a taskbar button of a running app
or group of apps, a thumbnail preview appears on the screen. For a
single window it shows a single thumbnail, and for multiple windows it
shows a number of thumbnail previews in a row. If you wish to disable
these thumbnails in Windows 10, I will explain how it can be done with a
simple Registry tweak.
To disable taskbar preview thumbnails in Windows 10, do the following:
Before:

After:
 It is possible to disable taskbar thumbnails only for a group of opened windows i.e.multiple instances of the app. Once this is done, Windows 10 will show a list of windows instead of thumbnails.
The list makes it easier to identify them from a group instead of
mostly similar looking thumbnails. To do this, follow these
instructions:
 It can control all mentioned parameters in the article and many more. Using this tool, you will be able:
To disable taskbar preview thumbnails in Windows 10, do the following:
- Open Registry Editor.
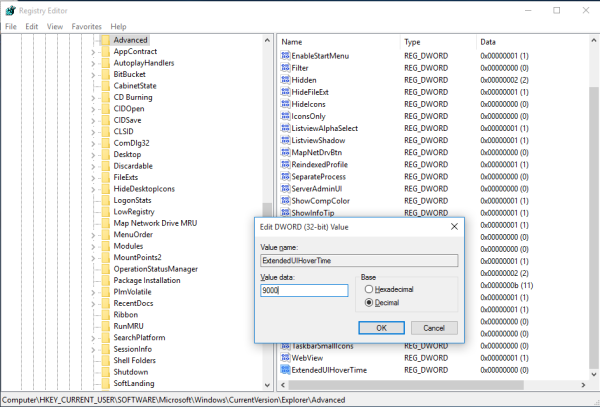
- Go to the following Registry key:
HKEY_CURRENT_USER\Software\Microsoft\Windows\CurrentVersion\Explorer\Advanced
Tip: You can access any desired Registry key with one click. - Here, create a new 32-bit DWORD value named ExtendedUIHoverTime.
Note: If you are running 64-bit Windows 10, you still need to create a
32-bit DWORD. Set its value data to 9000 in decimals. This means it will
show the thumbnail after 9000 milliseconds (or 9 seconds) of hovering
over any taskbar button. So, with such a high timeout value, you will
never see taskbar thumbnail previews.
- Restart the Explorer shell or sign out and sign in back to Windows 10.
Before:
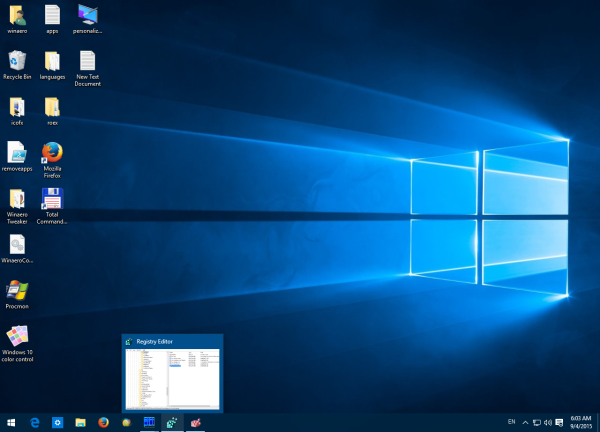
After:
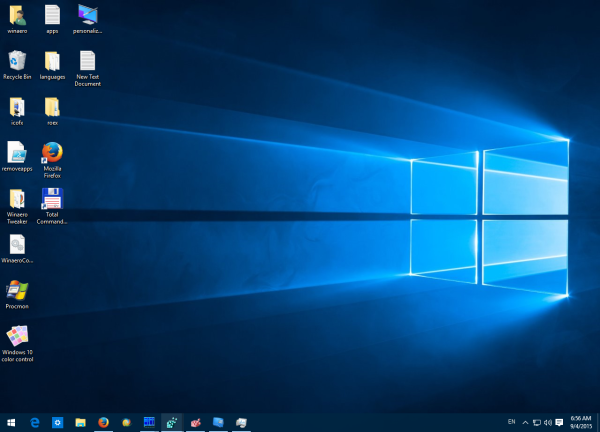 It is possible to disable taskbar thumbnails only for a group of opened windows i.e.multiple instances of the app. Once this is done, Windows 10 will show a list of windows instead of thumbnails.
The list makes it easier to identify them from a group instead of
mostly similar looking thumbnails. To do this, follow these
instructions:
It is possible to disable taskbar thumbnails only for a group of opened windows i.e.multiple instances of the app. Once this is done, Windows 10 will show a list of windows instead of thumbnails.
The list makes it easier to identify them from a group instead of
mostly similar looking thumbnails. To do this, follow these
instructions:- Go to the following Registry key:
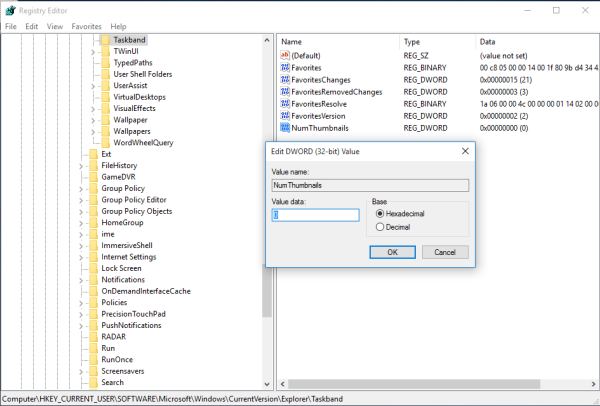
HKEY_CURRENT_USER\SOFTWARE\Microsoft\Windows\CurrentVersion\Explorer\Taskband
- Create a new 32-bit DWORD value named NumThumbnails. Leave its value as 0. Note: If you are running 64-bit Windows 10, you still need to create a 32-bit DWORD value.
- Restart the Explorer shell or sign out and sign in back to Windows 10.
Or simply try this software
Winaero Tweaker
If you would like to avoid Registry editing, here is good news for you. In the past, I created a freeware tool called Winaero Tweaker, One of its options is "Taskbar Thumbnails". It can tweak and change many hidden secret taskbar thumbnail parameters which cannot be changed via the Windows 10 GUI.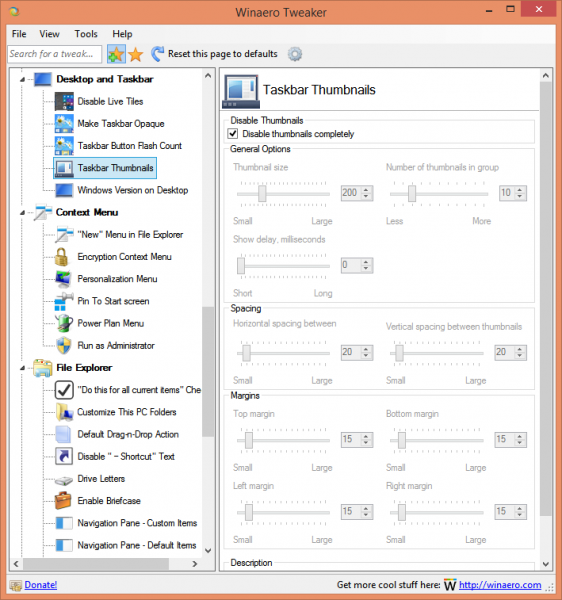 It can control all mentioned parameters in the article and many more. Using this tool, you will be able:
- Adjust thumbnail size.
- Adjust number of grouped application thumbnail windows.
- Adjust horizontal spacing between the thumbnails.
- Adjust vertical spacing between the thumbnails.
- Adjust thumbnail's caption position.
- Adjust thumbnail's top margin.
- Adjust thumbnail's bottom margin.
- Adjust thumbnail's left margin.
- Adjust thumbnail's right margin.
- Completely disable taskbar thumbnails.
Friday, August 19, 2016
How to remove trailing spaces from cells in Microsoft Excel?
Sometime we may add unwanted spaces in Excel cells, which are not
easy to find out but affect sorting, calculating, or others. This
article will introduce several methods to remove trailing spaces after
text strings of cells in Microsoft Excel.
Kutools for Excel: 200 new features for Excel, make Excel much easy and powerful, increase productivity immediately.
Using the Trim function is easy to remove the trailing space in one cell, but time-consuming to remove trailing spaces in many cells. Here provides a macro to remove all trailing spaces of all cells in a selection.
Step 1: Select the range in which you want to remove trailing spaces from cells.
Step 2: Hold down the ALT + F11 keys, and it opens the Microsoft Visual Basic for Applications window.
Step 3: Click Insert > Module, and paste the following macro in the Module Window.
Maybe
you are not familiar with Microsoft Excel's Macros, and need time to
study it. Please do not worry about it. The second method is provided by
a third-party add-in, Kutools for Excel. Its Remove Spaces tool can help you remove trailing spaces from cells quickly.
Kutools for Excel includes more than 120 handy Excel tools. Free to try with no limitation in 30 days. Get it Now.
Step 1: Select the range in which you want to remove all trailing spaces from cells.
Step 2: Click the Kutools > Text Tools > Remove Spaces. See screenshot:

Step 3: In Remove Spaces dialog box, check the Trailing Spaces option in Spaces Type section. See screenshot:

Step 4: Click OK or Apply. And all the trailing spaces after the text string have been removed. See screenshot:
Kutools for Excel's Remove Spaces
tool makes it possible to delete all kinds of spaces from strings in
cells, including all extra spaces, leading spaces, trailing spaces, or
all spaces. Click to know more...
Recommended Productivity Tools
Office Tab: Bring handy tabs to Excel and other Office software, just like Chrome, Firefox and new Internet Explorer.Kutools for Excel: 200 new features for Excel, make Excel much easy and powerful, increase productivity immediately.
 Remove trailing spaces from cells in Excel with VBA
Using the Trim function is easy to remove the trailing space in one cell, but time-consuming to remove trailing spaces in many cells. Here provides a macro to remove all trailing spaces of all cells in a selection.
Step 1: Select the range in which you want to remove trailing spaces from cells.
Step 2: Hold down the ALT + F11 keys, and it opens the Microsoft Visual Basic for Applications window.
Step 3: Click Insert > Module, and paste the following macro in the Module Window.
Sub NoSpaces()
Dim c As Range
For Each c In Selection.Cells
c = Trim(c)
Next
End Sub
Step 4: Press the F5 key to run this macro. And all of the trailing spaces of the selection will be removed.Dim c As Range
For Each c In Selection.Cells
c = Trim(c)
Next
End Sub
 Remove trailing spaces from cells in Excel with Kutools for Excel
Maybe
you are not familiar with Microsoft Excel's Macros, and need time to
study it. Please do not worry about it. The second method is provided by
a third-party add-in, Kutools for Excel. Its Remove Spaces tool can help you remove trailing spaces from cells quickly.Kutools for Excel includes more than 120 handy Excel tools. Free to try with no limitation in 30 days. Get it Now.
Step 1: Select the range in which you want to remove all trailing spaces from cells.
Step 2: Click the Kutools > Text Tools > Remove Spaces. See screenshot:

Step 3: In Remove Spaces dialog box, check the Trailing Spaces option in Spaces Type section. See screenshot:

Step 4: Click OK or Apply. And all the trailing spaces after the text string have been removed. See screenshot:
 |  |
Saturday, August 13, 2016
The Save As dialog box appears two times when you try to save a file in Word 2010 or in Word 2007
SYMPTOMS

CAUSE
RESOLUTION
To resolve this problem, create a new Normal.dotm file by changing the name of the old file. To do this, follow these steps:
- Start Windows Explorer, type %appdata%\Microsoft\Templates in the address bar, and then press Enter.

- Right-click Normal.dotm, and then click Rename.

- Change the file name to Normal.old.dotm.

- Restart Word. A Normal.dotm template is automatically generated.

- Try to save a file to check whether the problem is resolved.
Wednesday, March 9, 2016
Count The Number of Cells With Specific Cell Color By Using VBA
Here the steps to create the count cell color UDF:
source:https://support.microsoft.com/en-us/kb/2815384
- Open Microsoft Excel then press Alt+F11 to show Visual Basic Editor window.
- On Insert menu, select Module to create a module. Then write the following script:
Function CountCcolor(range_data As range, criteria As range) As Long
    Dim datax As range
    Dim xcolor As Long
xcolor = criteria.Interior.ColorIndex
For Each datax In range_data
    If datax.Interior.ColorIndex = xcolor Then
        CountCcolor = CountCcolor + 1
    End If
Next datax
End Function
- Close VBE window and back to Excel.
- To test the UDF, create some example data, or you can download this example file here.
- At cell D3, write the function: =CountCcolor(range_data,criteria)
in range_data argumen, select cell C2 to C51
in criteria argumen, select cell F1
- Press Enter and in cell F2 the result is 6. It means the number of cells with Blue cell color is 6 cells.

- You can also test another color. Change the color in cell F1 with any color you want from the data by using Format Painter to get same color.

- You can also pack the UDF, so that function can be used in another workbook and machine. Please following this steps :
Step 1: Save The Workbook- Fill the name that you want named to at the File Name box. Here I name it Count Cell Color.
- For the file type, choose Excel Add-In (.xlam) format.

Note: You can save your Add-In file anywhere you want. But if you want it to be listed on Excel built-in, you should save it into the default location. On my computer with Windows 7 operating system, the default location for any versions of Microsoft Excel is: C:\Users\RADDINI\AppData\Roaming\Microsoft\AddIns
Step 2: Install the Add-In- Open Microsoft Excel on computer that you want install the Add-In. Open Add-Ins dialog box by clicking Add-In on the Developer tab.
- On the Add-In dialog box, click Browse button so Browse dialog box is displayed.

- Go to file location that Add-In file is saved. Choose the file and then click Open.
- On the Add-Ins dialog box make sure the add-in checkbox is unchecked. Then click OK.

source:https://support.microsoft.com/en-us/kb/2815384
Subscribe to:
Comments (Atom)

